Guide · Intermediate · Raspberry Pi
Raspberry Pi 5 as a 3D Printer Controller — Setup Guide (Ops-Focused)
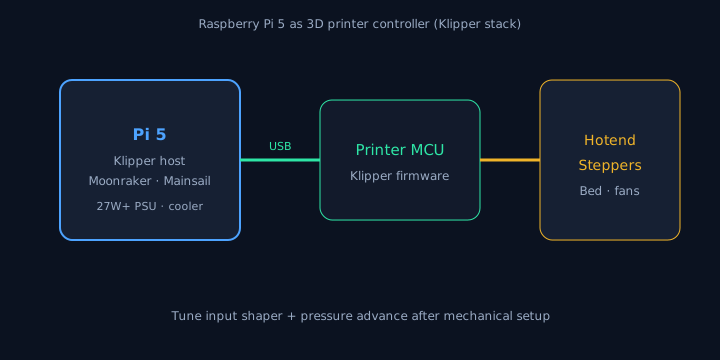
Pi is the host: Klipper host + UI or OctoPrint. MCUs still run real-time stepper work — wire and power accordingly. Pair with OrcaSlicer review and the print farm AI stack (AI for notes only — never auto-flash u…
Project template
- Goal & materials
- Steps / firmware
- Troubleshooting
- AI assist notes
- Related gear & books
Pair with OrcaSlicer review and the print farm AI stack (AI for notes only — never auto-flash unreviewed config).
Roles (do not confuse them)
| Layer | Examples | Job |
|---|---|---|
| Host | Pi 5 | Klipper host, Mainsail/Fluidd, OctoPrint, cameras, network |
| MCU | Printer board / toolhead MCU | Steppers, heaters, endstops in real time |
| Slicer PC | Laptop | Orca/Prusa/Bambu projects — not required on the Pi |
BOM extras for a reliable host
| Item | Why | Ballpark |
|---|---|---|
| Pi 5 official PSU | Brownouts look like random disconnects | ~$12–20 |
| Active cooler / case airflow | Thermal throttle during webcam + host load | $5–20 |
| NVMe HAT or quality SD | Log writes destroy cheap cards | $15–60 |
| USB camera (optional) | Failure forensics | $10–30 |
| USB-UART path as needed | Board-specific | $0–15 |
Software path options
- Klipper + Mainsail/Fluidd — best control model for many performance printers; config is powerful and sharp-edged.
- OctoPrint — plugin ecosystem and familiarity; still excellent for many machines.
- Vendor-locked hosts — fine if you accept the garden.
Network & safety
- Printer hosts do not belong on the public internet.
- Separate VLAN/IoT SSID when you can.
- Back up
printer.cfg/ OctoPrint config before clever edits. - Any AI “review” of config must be treated as a diff assistant — you confirm pins, currents, and temps.
Commissioning checklist
| Step | Pass |
|---|---|
| Host boots headless after power loss | Returns without keyboard |
| UI reachable on LAN only | No WAN exposure |
| Homed axes / heaters respond | Per your firmware docs |
| Emergency stop path known | Physical + UI |
| Config backed up off-box | git or dated copy |
Export it like code
printer-host/
  printer.cfg          # or octoprint tarball
  moonraker.conf
  NOTES.md             # board, sensorless?, probe type
  backups/YYYY-MM-DD/
Verdict
Pi 5 is a strong printer host when powered and cooled correctly and kept off the open internet. It will not save a bad mechanical printer. Fix belts and first layer before buying another SBC.